eSIM Cards
Which Motorola phones are eSIM compatible?
Motorola has a great range of eSIM-compatible phones, providing a more convenient and flexible alternative to traditional SIM cards. Models in the Razr, Edge, and G series are among the…
Advertising Disclosure
Roami was founded to serve as a trusted resource for travelers in need of reliable internet solutions abroad. Our team, comprising avid travelers, provides comprehensive reviews and guidance on data SIM cards, eSIMs, pocket WiFi devices, and free WiFi apps, drawing from firsthand usage during our travels.
We are committed to offering unbiased and thorough recommendations. To support our website, we earn affiliate commissions from links to products on our site. While our reviews are independent and based on our own experiences and detailed product testing, these commissions allow us to cover costs and continue bringing valuable advice to travelers worldwide.
Our reviews and articles are updated regularly to ensure relevance and accuracy. Please note that we may not review every product in the market, but we strive to cover as many as possible to maintain a wide-ranging resource for our readers. Join us at Roami to stay connected wherever your travels may take you.

Moving your eSIM to a new iPhone is a quick and simple process. Follow this step-by-step guide to ensure a smooth transfer between devices.
Transferring an eSIM to another iPhone is a common task. Whether you’ve just upgraded to the latest model or bought a second hand iPhone, you want to continue with your existing eSIM.
If you haven’t done it before, you may wonder if it’s complicated. Don’t worry; transferring your eSIM is easy and ensures uninterrupted service on your new iPhone.
Follow this step-by-step guide to easily transfer your eSIM to a new iPhone.
Table of Contents
An eSIM is a digital alternative to the older physical SIM cards. The “e” stands for “embedded”. As such, the SIM card is embedded directly into your device, meaning there is no need for a physical SIM anymore.
The eSIM is automatically integrated into your device; all you have to do is digitally activate it, and you’ll be good to go. This means that you don’t need to change your physical SIM card when you change your operator or travel abroad. All you’ll need to do is manage your eSIMs from your device’s settings.
You’ll need the following to transfer your eSIM to a new iPhone:
Tip: Newer iPhones can support up to eight eSIMs. This lets you manage multiple numbers or plans on one device, making it ideal for business use or frequent travelers.
No, not all carriers support eSIM transfers between devices.
The majority of major carriers across the US, Europe, and Australia support eSIM transfer between your iPhones. However, there are still some exceptions, particularly with smaller carriers, regional providers, or in specific countries where eSIM adoption is slower.
Here’s a summary list of the carriers that don’t support eSIM transfers:
The takeaway is that it’s essential to check with your specific carrier to confirm compatibility.
Thankfully, the process is straightforward if your carrier supports eSIM transfers.
If you’ve already set up your new iPhone, you can still transfer your eSIM from your old iPhone by following these steps:
The eSIM will now be active on your new iPhone, and the service will no longer be available on your old iPhone.
If you need to enter the eSIM details manually, follow these steps:
If you’re setting up your new iPhone for the first time, you can transfer your eSIM as part of the setup process.
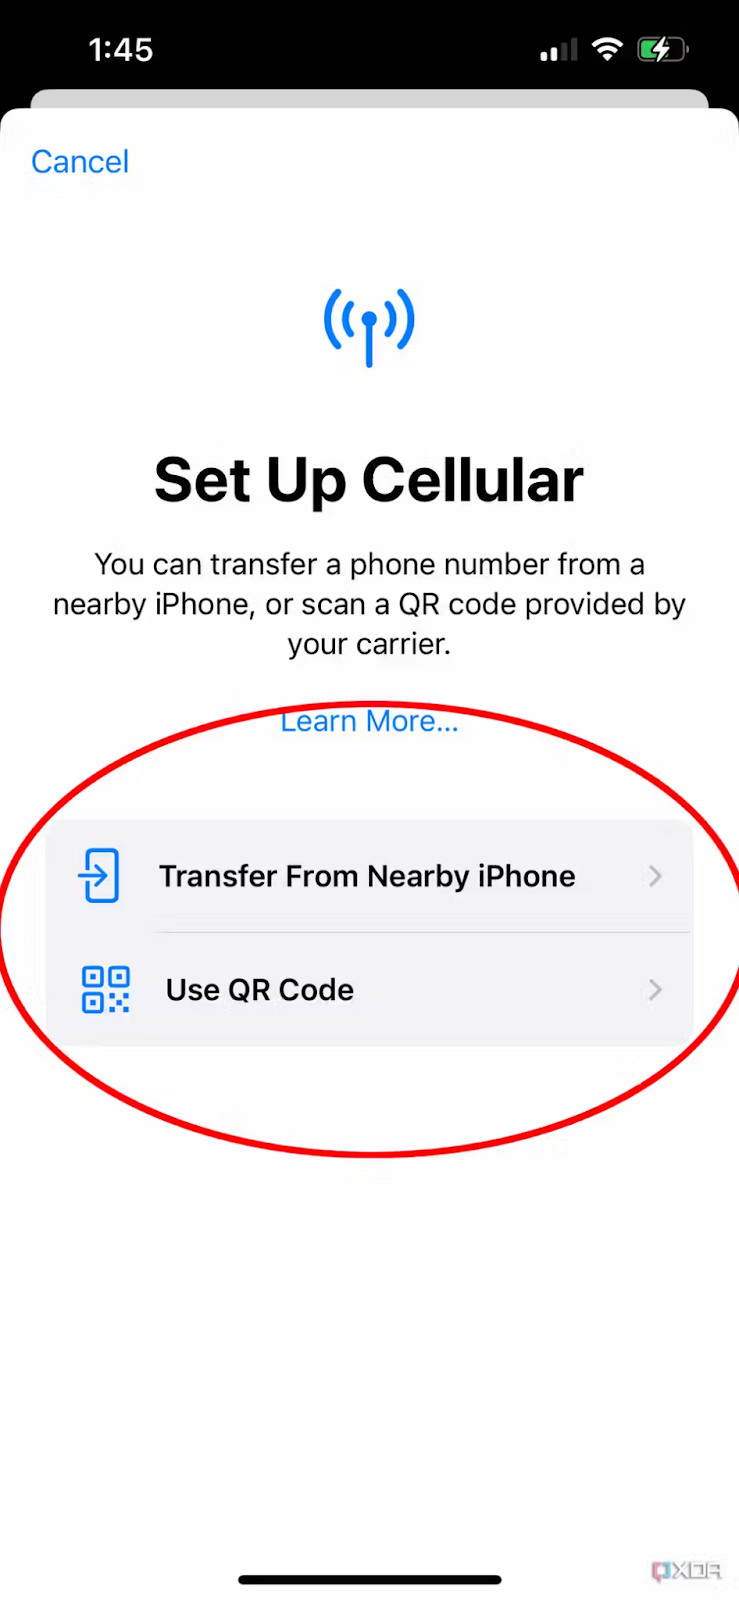
With iOS 17, Apple introduced a new feature allowing eSIMs to be transferred between iPhones via Bluetooth during setup. Here’s how to do it:
This method makes transferring eSIMs even easier and removes the need for a new eSIM when switching phones.
Yes, you can transfer your eSIM to other iPhones as long as they are eSIM-compatible. Generally, iPhones from the iPhone XS onwards support eSIM.
Still, it’s crucial to verify that both your old and new iPhones are eSIM-compatible before attempting a transfer.
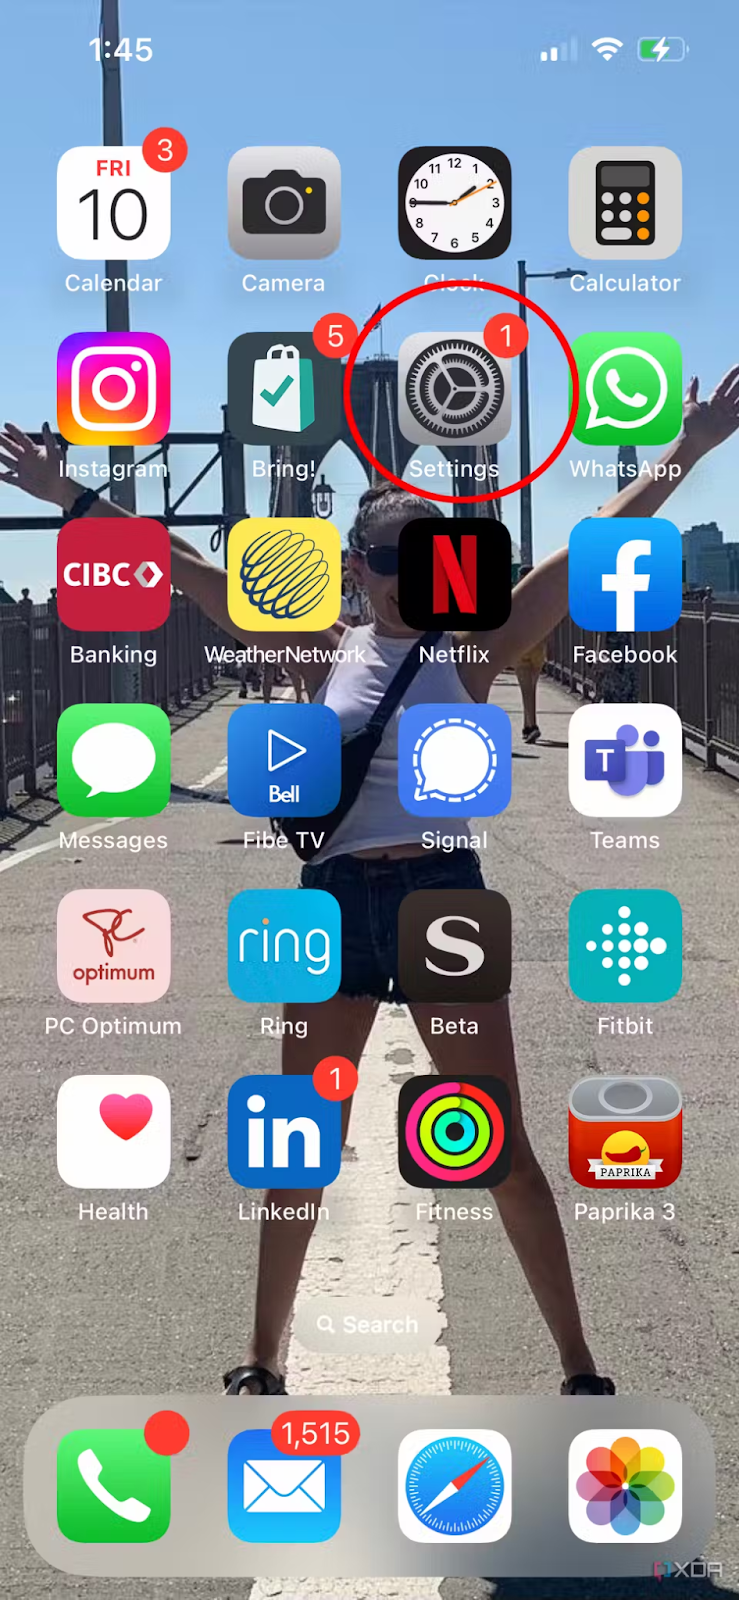
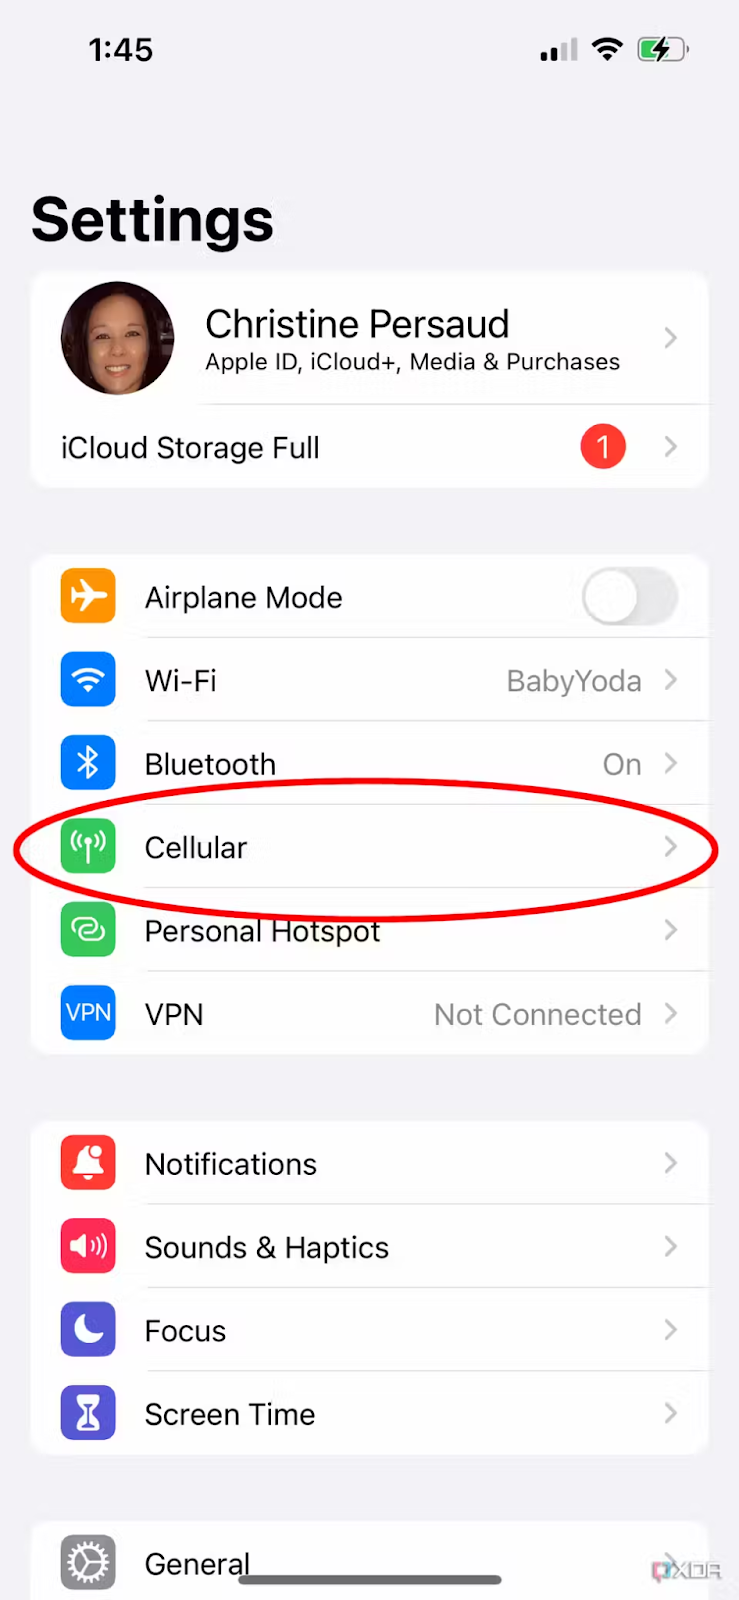
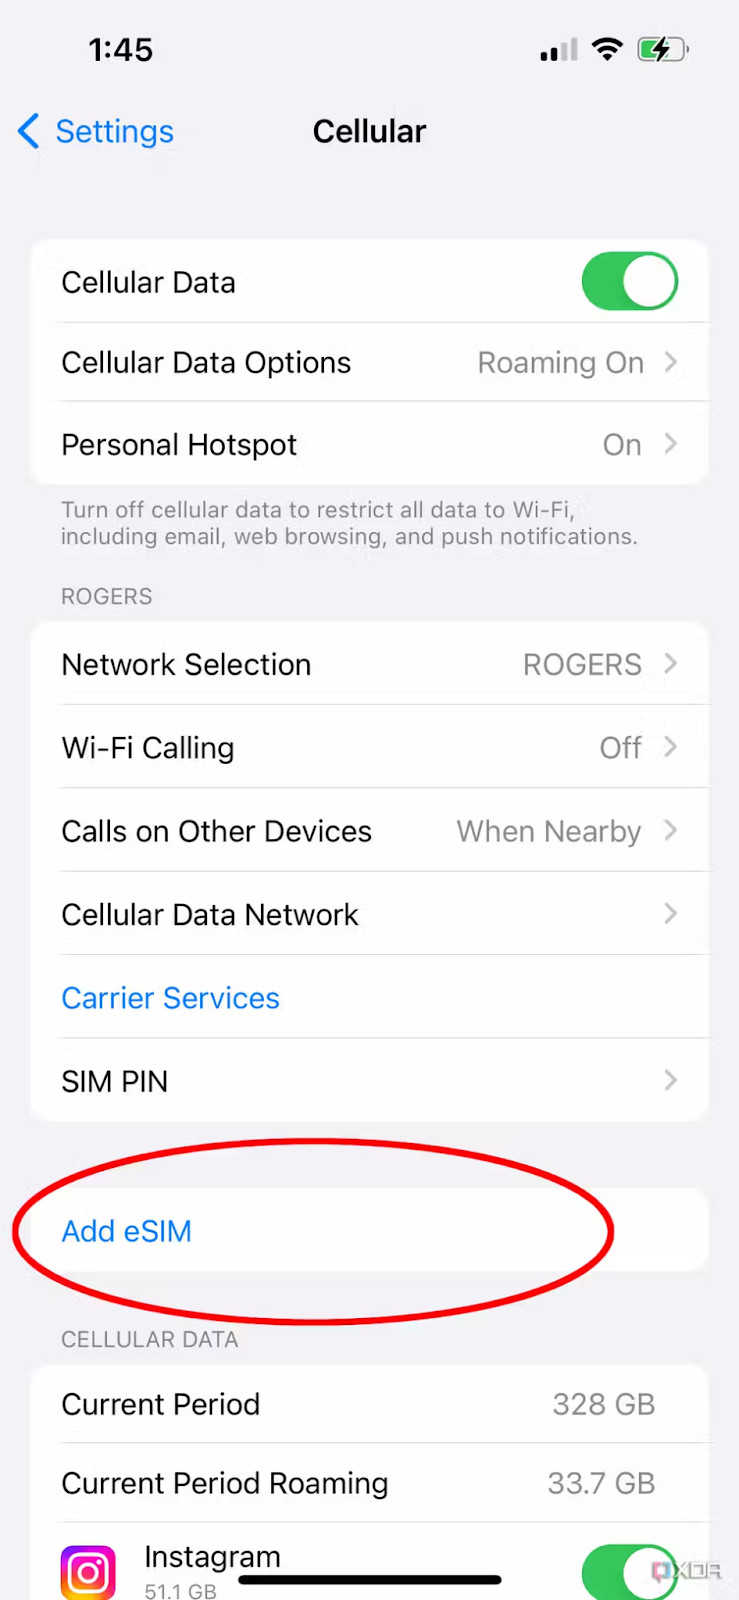
You can quickly find out if your iPhone is eSIM-compatible via your device settings Go to Settings > Cellular > Add Cellular Plan. If you see an option to add a cellular plan, your device supports eSIM.
For a detailed list of compatible models, refer to our compatibility guide.
All iPhones that support eSIM can have multiple eSIMs and use Dual SIM. Dual SIM means you can have two active SIMs at the same time. You can use Dual SIM by combining a physical SIM and an eSIM, or by using two active eSIMs on models without a physical SIM tray, like the iPhone 15.
Why might you want to do this?
Dual SIM functionality offers a few key benefits:
Both SIMs can make and receive calls, send messages, and use data, but only one cellular data network can be active at a time.
Note that you can also convert physical SIMs to eSIMs on any iPhone that supports eSIMs. Here’s how:

With more iPhones embracing eSIM technology and moving away from physical SIM cards,it’s important to know how to transfer your eSIM between devices. The introduction of Bluetooth transfers with iOS 17 simplifies the process even further, letting you switch devices with even less hassle.

eSIM Cards
Which Motorola phones are eSIM compatible?
Motorola has a great range of eSIM-compatible phones, providing a more convenient and flexible alternative to traditional SIM cards. Models in the Razr, Edge, and G series are among the…
eSIM Cards
Google Pixel phones eSIM compatibility: All you need to know
Many Google Pixel phones are eSIM-compatible, which means you can stay connected without relying on a physical SIM card. Generally, you can use models after the Google Pixel 5 with…
eSIM Cards
Which iPhones and iOS devices support eSIM in 2024?
In 2024, iPhone eSIM support has become a standard feature across many of Apple’s models, offering flexibility for users to manage their network options seamlessly. In fact, iPhone XS, iPhone…
eSIM Cards
Samsung eSIM phones – compatible phones and how to activate
A Samsung eSIM works just like any other embedded SIM, which means you can also choose from the most popular providers as long as your Samsung phone is eSIM compatible.…